Working from home. Once the realm of the few, now the new normal for the many. There has been a sea change and the landscape around home working has probably changed for good. But, while the computers and desks at the office are set up according to national ergonomics standards and guidelines, at home perhaps not so much.
Dining tables; kitchen chairs; unergonomic home offices used once in a blue moon. Before you know it, you’ve adopted a position somewhere between a turtle and the leaning tower of Pisa – that classic crouched-over, neck-craned-forward, shoulders-hunched posture. And inevitably, with that scrunched together positioning comes vague musculoskeletal discomfort, niggling aches, then searing pain.
The solution is surprisingly simple. Adjust your workspace to your body, not your body to the workspace. They call it ergonomics (“er-guh-NOM-iks”). And the more stuff you can adjust to suit your body and individual needs, the better.
Every body is different. Your height, the length of your limbs, the curve of your back, and so much more, are different from everyone else. That means you need to adjust any workspace where you intend to spend a significant chunk of time.
Getting Started
The goal is to configure your workspace until it fits you like a glove. This guide walks you through it step-by-step, whether you have highly adjustable office gear with a ton of ergonomic settings or more basic equipment – a chair at the kitchen table.
These guidelines, are just that – a guide. Don’t think of them as immutable, but something to fine-tune until you find your sweet spot – a comfortable and relaxing position. That means no scrunched up shoulders, leaning forward, or any other position that leaves you with tight, stiff, and achy muscles at the end of the day.
To correctly set up your ergonomic office, move your chair as close to the desk as you comfortably can and sit back in the chair, with your back against the backrest. You should also adopt this position when you work.
Step 1
ADJUST THE CHAIR

Sitting awkwardly for extended periods of time is associated with discomfort and a host of other musculoskeletal issues, but can be prevented or mitigated with a properly adjusted office chair.12
How you sit is determined by two key factors, the height of your chair and the height of your keyboard/ desk. And they must be in harmony. Discord between them increases the risk of suffering with musculoskeletal problems such as neck and back pain.3
In a perfect world, the chair is adjusted according to your legs, while the desk/ keyboard to your upper body. In practice, how you adjust chair height will vary, depending on whether you can change the height of your desk:
Fixed height desk. Adjust the height of the chair so your upper body is correctly positioned at your desk (go to next step to do this). Then properly position your lower body, as illustrated below and make any necessary adjustments.4
- Cannot rest feet flat on floor. Use a footrest, or sturdy books, big enough to rest both feet comfortably (approx. 30×30 cm).
- Knees higher than thighs. Raise your desk/ keyboard to a height that also allows you to sit with your legs correctly positioned (e.g. use different desk, put desk raisers under desk legs).
Adjustable height desk. Adjust chair to achieve optimal lower body posture.
Ideal Lower Body Posture
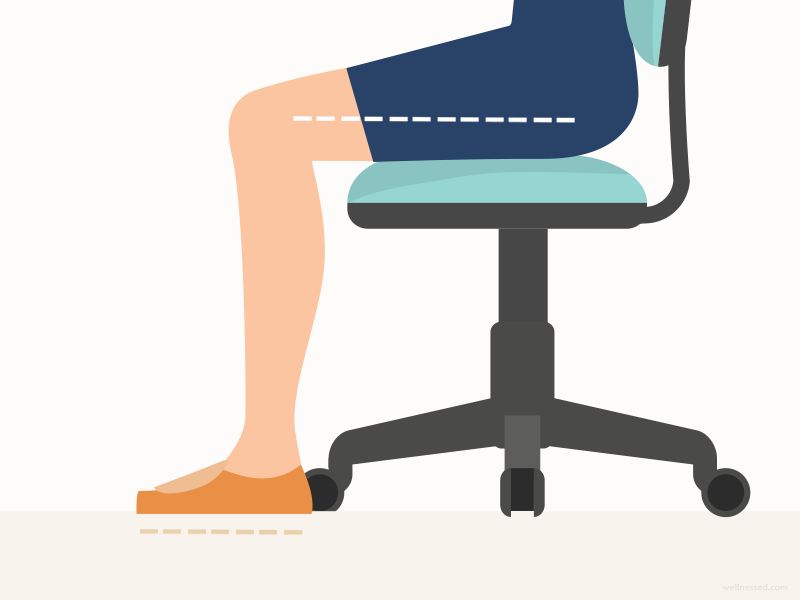
Goal: Feet can comfortably rest flat on the ground and thighs are parallel to the floor or slightly sloping down (knees a touch lower than thighs).56
How to adjust: Standing in front the chair, change chair height so the top of the seat pan is in line with the bottom of your kneecaps.
Next, while seated in the chair, fine-tune until your thighs are parallel to the floor (or slightly sloping down).
- If you do not have a height-adjustable chair (e.g. kitchen chair) and you need to raise the height, place a pillow or folded towel on the seat.
Don’t use a footrest unless you are unable to place your feet flat on the ground and avoid resting your feet on the chair’s castors.
Other Chair Adjustments
Office chairs are the foundation upon which the rest of your ergonomic workspace is built. Office chairs can have a wide array of features that you can adjust, such as seat depth, seat tilt, backrest height, backrest tilt, armrest height, and armrest width.
Here we only address how to adjust chair height. However, you should adjust all of these features. Read this easy to follow, step-by-step guide on how to adjust your office chair. Even if your chair does not have all (or any) of the above controls, it will walk you through how to adjust and make your chair more ergonomic at each step.
Read more: Complete guide to adjusting your office chair
Step 2
ADJUST THE DESK

The height of the desk relative to your body strongly influences the posture of your upper body.
Ideal upper body posture
Goal: Relaxed shoulders, with arms comfortably resting beside the body and back supported by backrest.
Optimal desk height varies, and is dependent on the tasks you perform and how you tend to support your arms:
- Don’t rest forearms on the tabletop when typing – Adjust the height of your desk or chair so that your desk is just below elbow height (see illustration below).

How to adjust: Sit back with arms resting by your side, and shoulders relaxed.
Change the height so your forearms are about parallel to the ground, fingers are hovering just above the keyboard, and elbows are bent about 90º (or slightly greater).*
* Illustrates the optimal height when typing without resting forearms on the tabletop. If you support your arms on the desk, change the height as explained above.
Your desk should also allow you sufficient knee space to easily position your legs under the desktop and plenty of room to comfortably stretch your legs or change positions.78
A work surface that is too high (quite common) causes scrunching up of the shoulders and raised arms, which leads to muscle fatigue, tension, or discomfort. Raise your chair and use a footrest to properly support your feet and legs. Alternatively, if you do a lot of computer work, you could lower the keyboard by mounting a keyboard tray under your desk.9
A work surface that is too low is likely to cause slouching, leaning forward, and rounding of the back, which stresses the back, shoulders, arms, and neck.10 Place desk raisers under the desk legs.
Working Zones
Organize your desk so that you have easy and unrestricted access to all the things you need. Your desk should be large enough that you can place your computer monitor at arm’s length.
Sitting as close to your desk as possible, categorize the items on your desk into 3 zones, according to frequency of use and importance.1112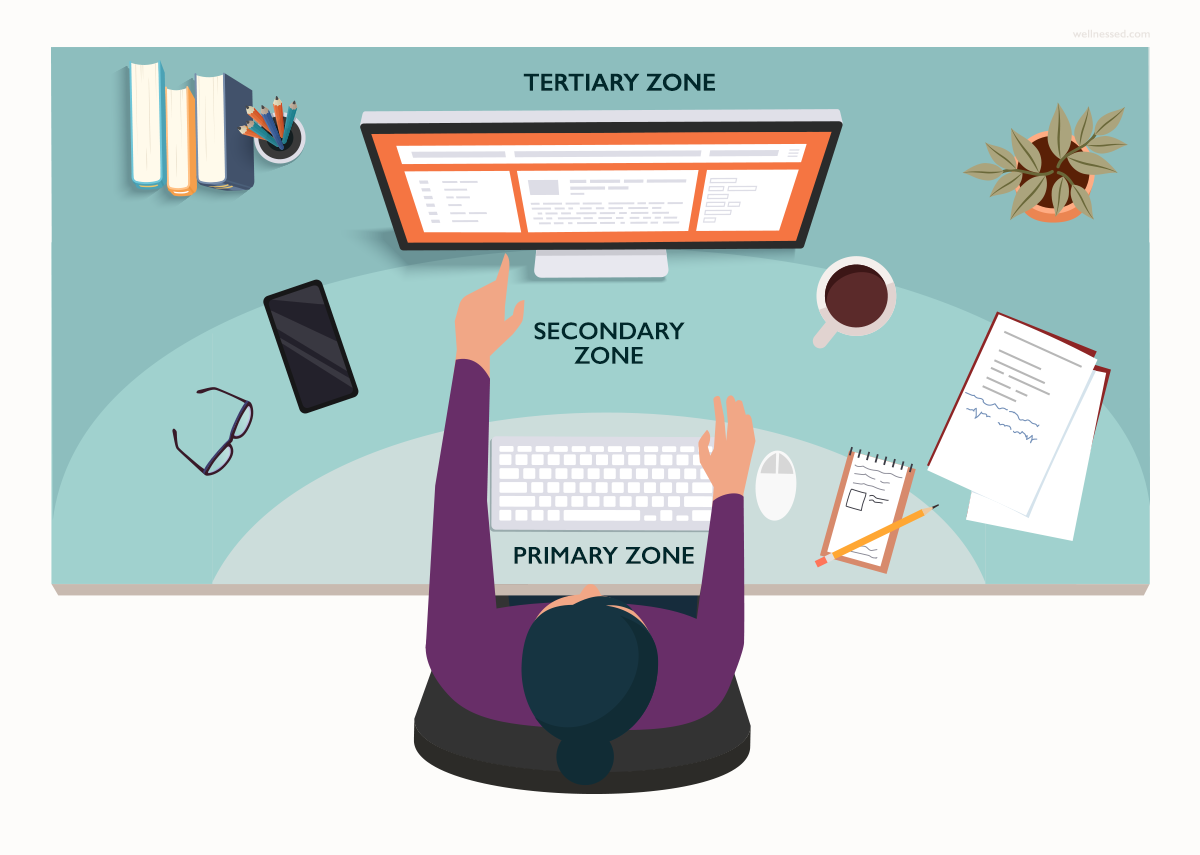
PRIMARY ZONE Within immediate reach – Items are no further than the knuckles when sitting right back in your chair with your elbows comfortably by your sides.
What to place: Keep items in this zone that you use most often or are important, such as the keyboard, mouse, pen, and paper.
SECONDARY ZONEWithin arm’s reach – Items are no further that the tip of your fingers when your arm is extended and you are seated with your back remaining in contact with the backrest.
What to place: Items that you use from time to time or are less important, such as a phone, reference materials, or cup of coffee.
TERTIARY ZONE Out of reach – Items that require you to lean forward to reach them and break contact with the backrest.
What to place: Seldom used objects, such as personal belongings, photos, plants, and rarely used books and stationary.
Arranging your desk into zones will prevent awkward twisting and reaching, free up space, and create a better organized and efficient work space.
step 3
ADJUST THE KEYBOARD
The height, placement, and slope of the keyboard affects how you angle your wrist, elbow, and shoulder joints. It also determines the degree of effort and stress placed on your upper body as you hold your arms over the keyboard.
Keyboard Height
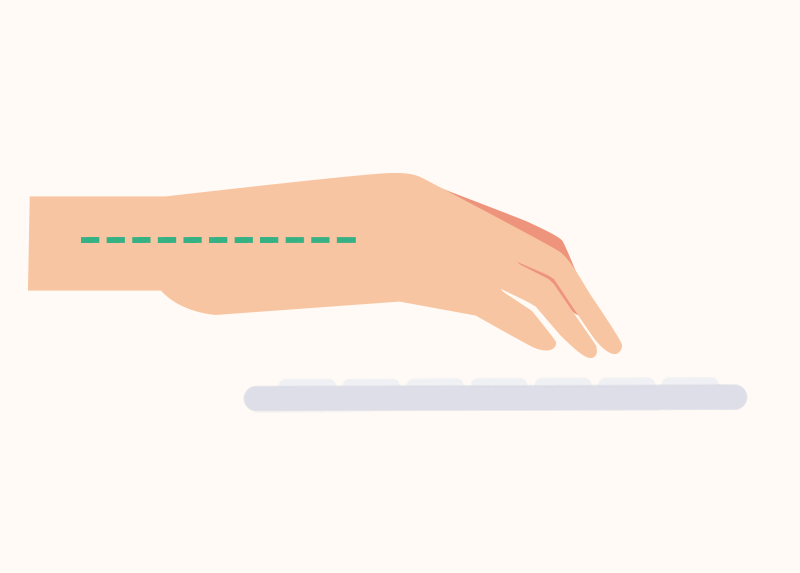
You should have already adjusted the desk/ keyboard height, as described in step 1 and 2. The optimal position when typing is for your arms to be bent 90º (or slightly more), with the upper arms comfortably by your side and the forearms and wrists parallel with the ground or angled downward slightly. Your hands should not be bent, but in a fairly straight line with your forearms.1314
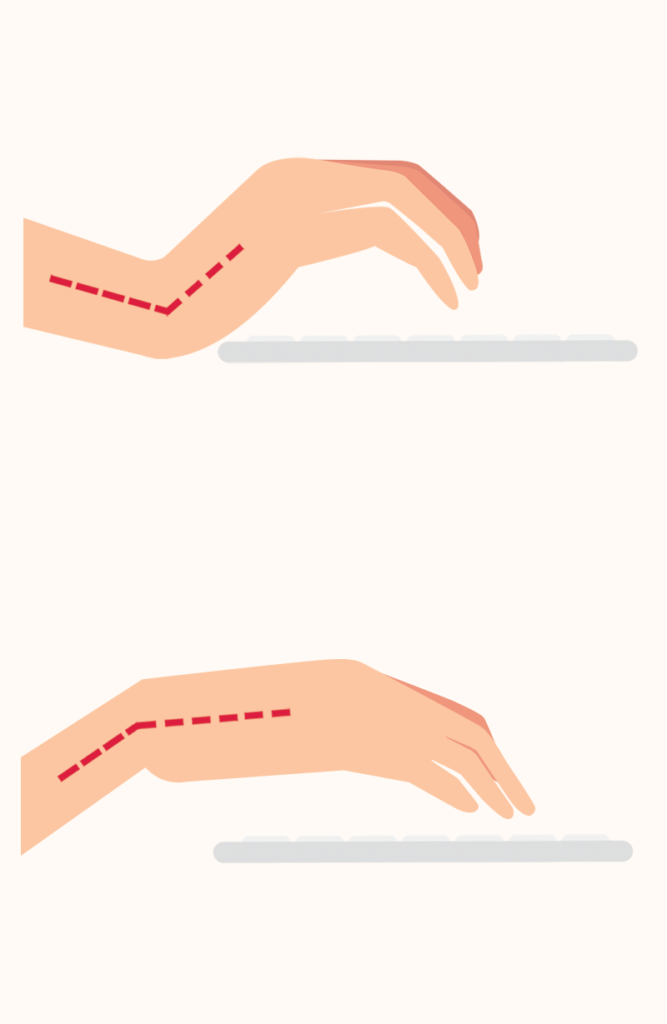
Placing the keyboard too low is likely to cause upward bending of the wrist. Conversely, a keyboard that is too high encourages typing with the wrists bent down and forearms sloping up, which can reduce blood flow to the hands and compress the nerves at the elbow.15
You can use an under-desk keyboard tray to lower your keyboard, if you have a fixed-height desk that is too high. A tilt-adjustable keyboard tray may be adjusted to a slightly negative angle (down and away from you), which can help relax the upper body and reduce wrist bending.16
Keyboard position
- Alignment: The keyboard should be aligned in front of you, so you do not have to twist your neck or body, or bend your wrists to the side. If you have a keyboard with a number pad, resist the urge to center the whole keyboard.
- Distance: Place the keyboard at a distance that feels most comfortable; close enough so you do not have to stretch your arms to reach the keyboard, but also room to rest your palms or forearms.
How to adjust:
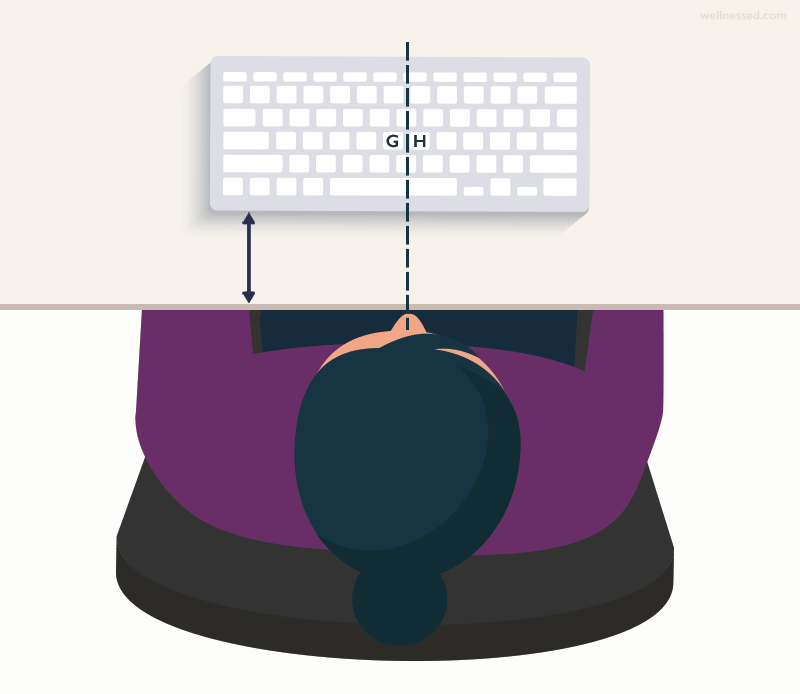
- Align the letter keys of the keyboard so that they are in the center – that is the “G” and “H” keys should align with your belly button.
- Place the keyboard at a distance of 10 to 26 cm from the edge of the desk edge and the home row of keys (same row as “G” key).
How far way you place the keyboard depends on personal preference and how you support your arms:
- Keyboard near desk edge. Sitting right back in your seat, place the keyboard so that it is directly under your fingers when your wrists are straight, and your elbows are bent about 90º and beside your body – roughly 2 inches (5cm) between the edge of the desk and the front edge of the keyboard. You should have enough space to rest the palms of your hands.
The forearms are not supported in this position, unless you use an armrest. Most people prefer having their arms supported and may otherwise experience discomfort in the shoulders, arms, or hands.
- Keyboard away from desk edge. Sitting right back in your seat, position the keyboard away from the front edge of the desk so that your forearms are comfortably resting on the tabletop. Supporting your arms this way has been shown to reduce shoulder and neck pain.
Type of Keyboard
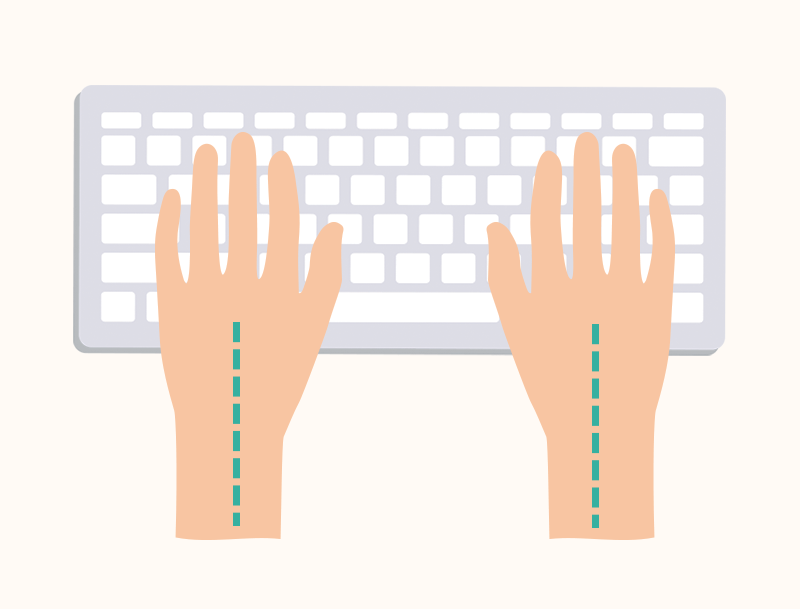
The optimal typing posture is for the wrists to be mostly straight, not angled outwards or inwards. This helps to reduce strain on the the fingers, wrists (carpal tunnel syndrome), and the outside of the elbow (tennis elbow).
Flat keyboard: To support a neutral posture, ideally use a low, flat keyboard. Beware of steeply sloping keyboards, as this makes it difficult to keep the wrists flat.19 If at the correct height, you should not need to use the legs to raise the back of the keyboard; otherwise it may encourage you to bend your wrists upward.
Sloped keyboard: Non-touch typists who have to look at the keyboard when typing find a sloping keyboard easier to see without having to lean forward. (However, this also makes it more difficult to adopt neutral postures, increasing the risk of musculoskeletal discomfort and injury.)
If you are sitting lower than optimal, elevating the back of the keyboard may help you achieve better hand posture.20
Split ergonomic keyboard: The keys are separated to help keep wrists, as well as the forearms straight (parallel), reducing strain on the wrists and elbows. They may be useful in cases of wrist, forearm, or elbow pain.21
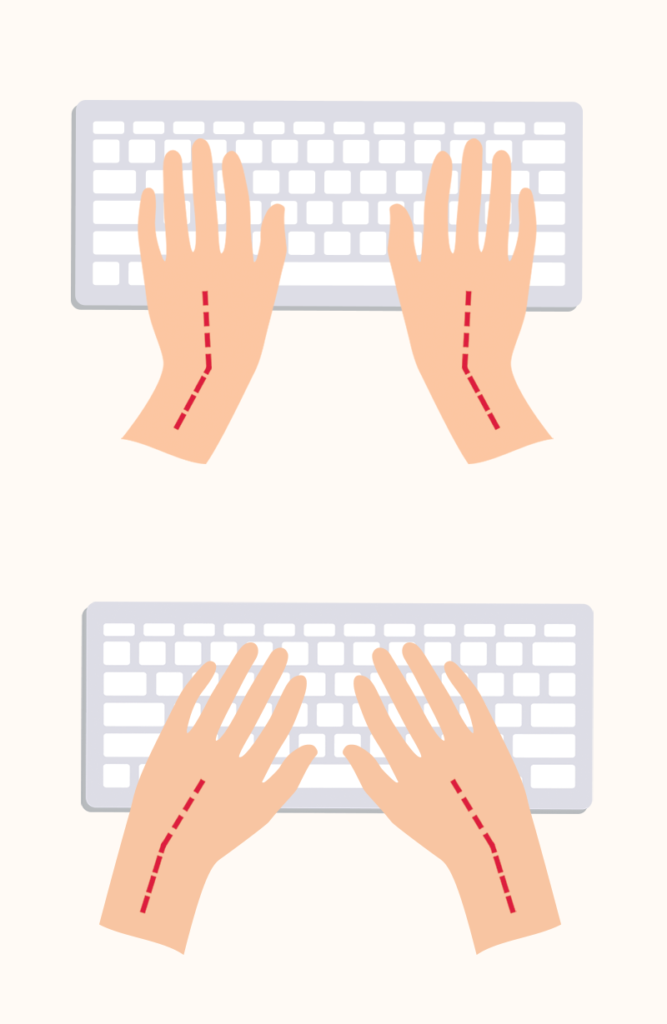
Poor Hand Posture
Avoid bending your wrists upward, downwards, or sidewards. This increases stress on a sensitive part of the wrist (carpal tunnel), reduces circulation, and increases the risk of repetitive strain injury.2223
Typing tips
- Try not to rest your wrists on the desk when typing, this bends them up. When resting your hands during typing breaks, the base of the palm of the hand should rest on the table (or pad), not the wrist.
- Use a soft touch when typing.
- Avoid hovering your hands over the keyboard when you stop to read or think. Instead take your hands off the keyboard and mouse.
step 4
ADJUST THE MOUSE

The placement of the mouse affects the positioning of your fingers through to your shoulders. Optimal placement of the mouse can help prevent “mouse shoulder” (shoulder discomfort; difficulty raising arm above head or behind back), as well as discomfort elsewhere in the arm you mouse with.
Mouse Position
Position the mouse according to personal preference and so that your arm remains relaxed beside your body while mousing:
- Next to the keyboard. Place the mouse as close to the keyboard as possible – within the span of your shoulders. If you are right-handed, a keyboard without a number pad allows you to keep the mouse closer and optimally positioned.
Supporting your forearms on the desk during mouse use can lessen the load on the neck and shoulders, and reduce the risk of suffering with musculoskeletal problems.2425
Placing the mouse in a position where you need to stretch your arm, pivot it outwards, or move it away from your body increases stress on that arm, which increases the risk of suffering with upper back, shoulder, elbow, or wrist pain.26
Add-on: A flat mouse bridge/ platform lets you place the mouse over the numeric keypad – helpful if you are right-handed and have a keyboard with a number pad. Simply move it when you need to use those keys.
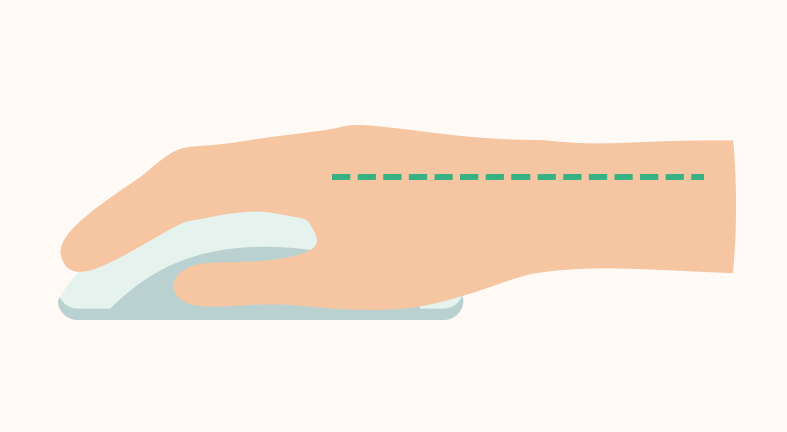
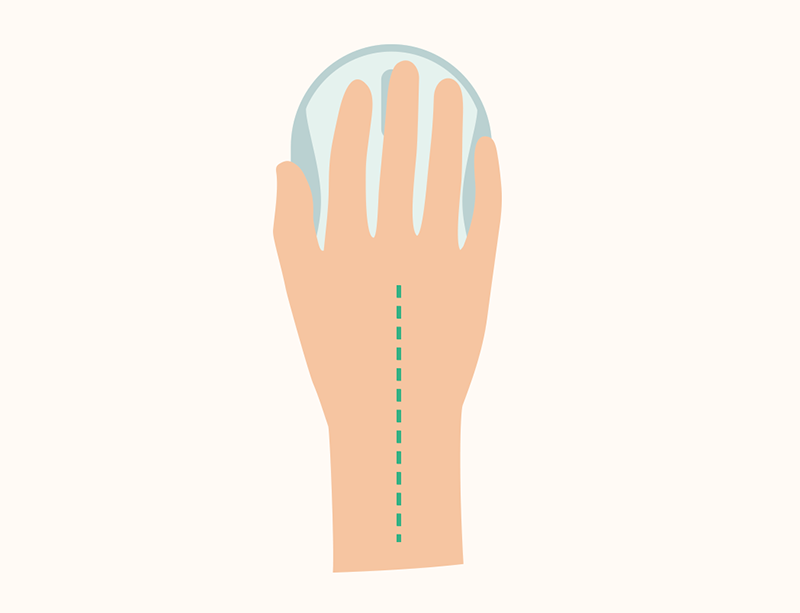
Ideal Mousing Posture
The ideal mousing posture is to lay your palm at the base of the mouse, which keeps your wrist flat and prevents you from resting your wrist on the desk. 27
Avoid bending your hand sideways to move the mouse. When mousing move your whole forearm, which engages the large muscles in the shoulder and upper arm instead of the delicate muscles of the wrist, which tire easily and are prone to repetitive strain injury.28
Do not use an armrest if it hinders your arm movement. Avoid anything that encourages you to move the mouse with your wrists and prevents your forearm from moving (including jewelry or a watch).
Tips to mouse with good posture:3031
- Hold the mouse gently – avoid a death grip.
- Rest your mousing arm by periodically alternating between the right and left hand.
- Minimize mouse use by employing keyboard shortcut and function keys, such as page down, instead of the mouse.
- Click buttons with the pulp of your finger, instead of the tip. Also, regularly vary the way you hold the mouse and the fingers with which you click the buttons.
- Adjust mouse sensitivity and tracking speed so that is feels comfortable and the pointer can cover the full-width of the screen while maintaining good wrist and arm posture.
- Buttons should respond to relatively light touch, but not be too sensitive that you inadvertently press them.
- When resting your hand, the palm of your hand should rest on the desk or pad – not your wrist.
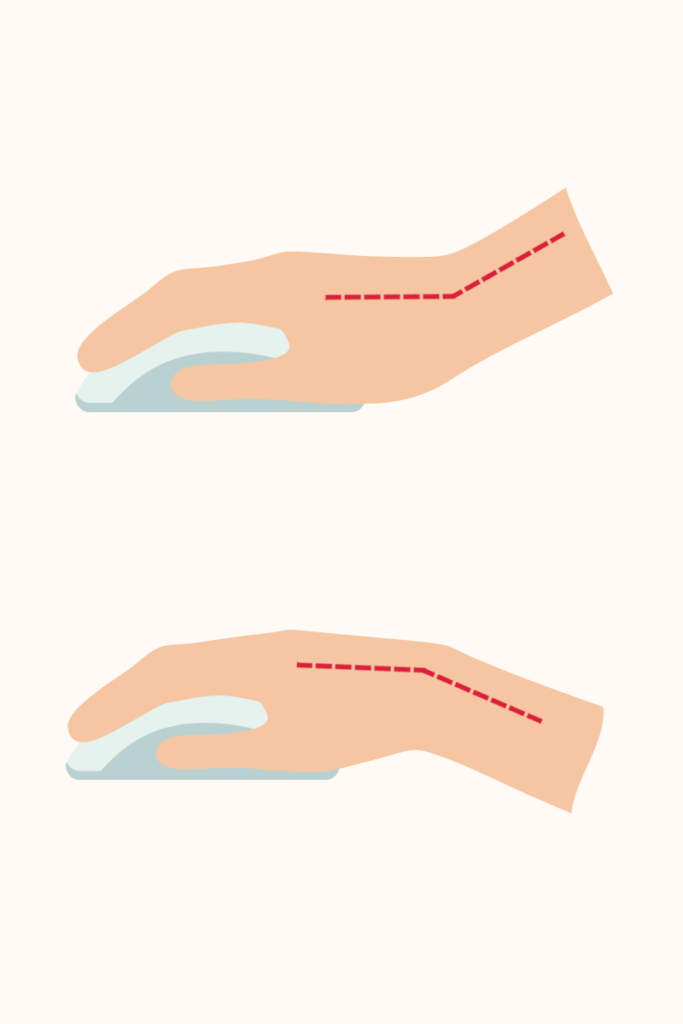
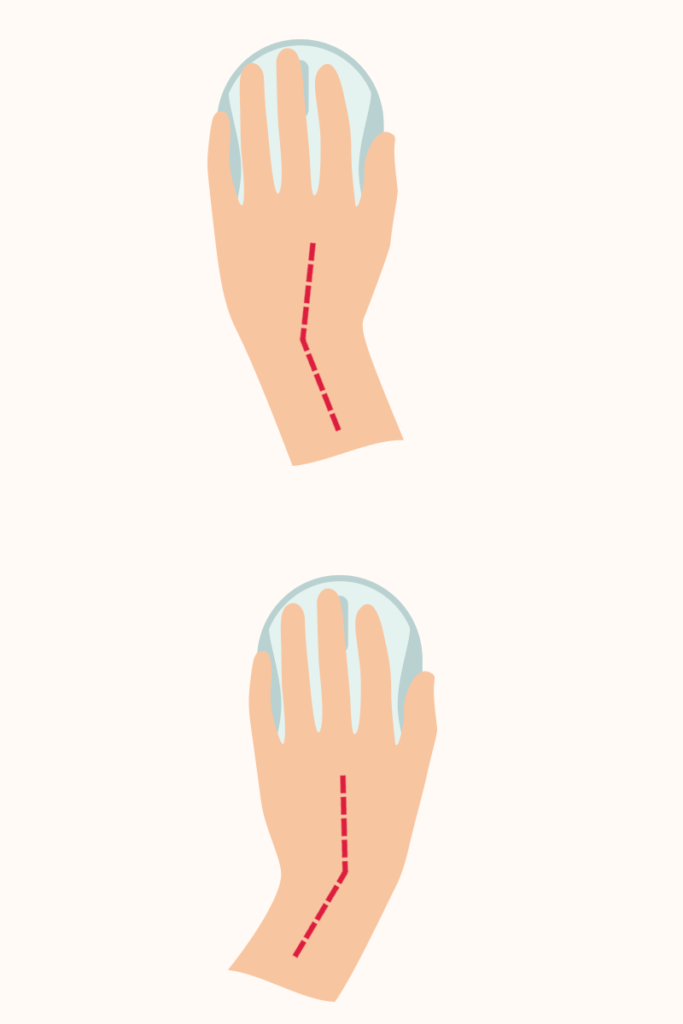
Poor Hand Posture
Avoid anchoring wrist on the desk and bending your wrist up, down or to the side. 32
These postures compress the nerves in the wrist and increase the risk of discomfort and injury in your mousing arm.3334
Mouse Size
A should mouse be comfortable to grip, which will depend on the size of your hand. Your hand should only partly cover the mouse when gripping it.
Most people use a mouse that is too small, which leaves a gap under the palm and results in a claw-like grip. A mouse that is larger, but still fits in the palm of the hand, encourages use of the arm rather than the wrist.35
The correct size mouse may vary with manufacturer. However, the table below provides a general guide.
| HAND | SIZE | MOUSE SIZE |
|---|---|---|
| Imperial | Metric | |
| < 6¾” | < 17cm | Small |
| 6¾” – 7½” | 17 – 19cm | Medium |
| 7½” – 8¼” | 19 – 21cm | Large |
| > 8¼” | > 21cm | Extra Large |
To determine the correct size mouse, measure the palm side of your stretched out hand, from the crease of your wrist to the tip of your ring finger.
Alternatives
Consider alternative devices that limit fine wrist movement, if using a mouse causes your wrist discomfort or fatigue:
- A handshoe mouse, which is an ergonomic mouse that is shaped to fit the hand, reducing stress on the forearm and shoulder.
step 5
ADJUST THE MONITOR

Place the monitor so that you do not have to move, twist, or tilt any part of your body.
Position. Center the screen in front of you – in a location free from glare (e.g. from overhead lighting or windows).36
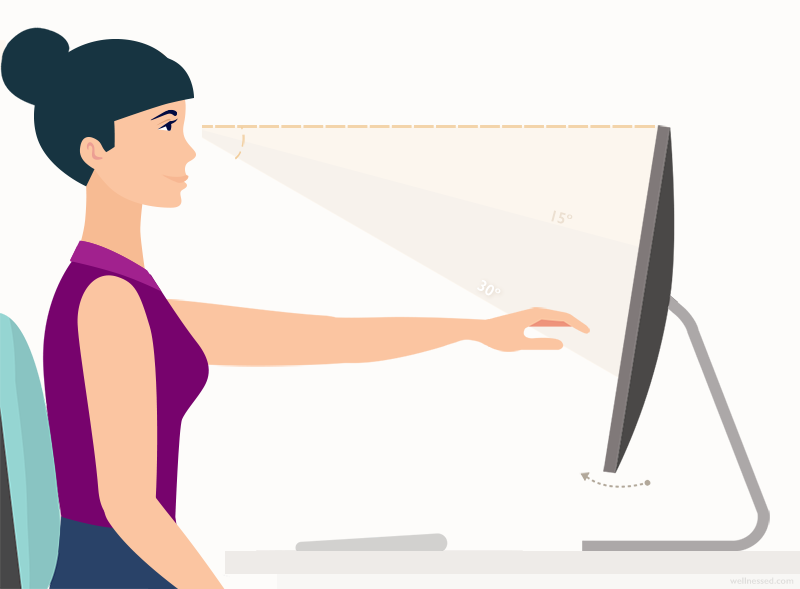
Height. The top of the display should be at or below your eye level. It is less tiring to look down than up and our natural gaze is about 15º – 30º downward.3738 Adjust screen height so that it is both comfortable for your eyes and neck.
You should not have to raise or lower your head to see the screen, which overworks the muscles of the head, neck, and shoulders.39 Research suggests that many people find placing the monitor about 15 degrees below the horizontal eye level most comfortable.40
Non-touch typists tend to favor a lower, closer monitor, to reduce nodding head movements caused by frequently switching between glancing at the screen and keyboard.41 People who wear multi-lens glasses for reading (e.g. bi-focal or varifocals) tend to view the screen through the bottom part of their lenses and thus need to lower the monitor – roughly 15cm below eye level – and tilt the monitor slightly more upwards, to avoid bending their head backwards.4243
Distance. Sit back in your chair, and place the screen about an arm’s length away – about 20 to 40-inches (50 – 100 cm).4445 The screen should be far enough so not to cause eye strain and fatigue, but close enough so that you can easily read all text while sitting back in your chair.
The size of the screen tends to dictate distance. Generally, larger screens should be placed further away than smaller ones.46 If you struggle to read smaller text at 20 inches (50cm), increase the font size instead of moving the monitor closer.
Tilt. Tilt the monitor slightly so the screen is perpendicular to your line of sight – an upward tilt of about 10º to 20º. However, if it increases glare from overhead lights, keep the monitor flat or adjust the tilt so it is free of glare.47
How to position monitor:
- Center the screen
- At or below eye level
- About an arm’s length away.
- Tilt upwards 10-20º.
Reference materials. When typing from paper documents, place them as close as possible to the screen. You can place reading materials next to the monitor (at the same height & angle) using a document holder, which is useful for touch typists. Alternatively, place materials between the monitor and keyboard using an angled reading board (or a three-ring binder), which is more comfortable for non-touch typists.
Staring at any object, including a computer screen, for extended periods of time can contribute to eye complaints such as eye strain, fatigue, and dryness (computer vision syndrome). To minimize eye strain: 48
- Follow the “20-20-20” rule – Every 20 minutes, take a 20 second break and focus on an object at least 20 feet (6 metres) away. Set an alarm as a reminder or use an app.
- Blink a few times, regularly, to moisten the eyes.
- Alternate screen work with other non-computer tasks (e.g. phone calls), to rest eyes.
- Adjust screen brightness and contrast to comfortable levels.
desktop replacement
ADJUST THE LAPTOP

Laptops are about as unergonomic as it gets. While brilliantly portable, the use of a laptop as a primary computer inevitably leads to incredibly poor posture and a host of musculoskeletal problems from head to toe – if unadapted.
If you’re using a laptop as your main computer at home or the office, you can still make many of the adjustments suggested above to create an ergonomic office space. You’ll need:4950
- An external keyboard and mouse, and set it up as described above.
- A laptop stand to raise the laptop to an optimal height, if your laptop monitor is large enough (15″ or more). Simply set it up in the same way as a stand-alone monitor. You can also use a stack of wide, sturdy books (ensure laptop has sufficient air circulation to keep cool).
- Consider an external monitor if your laptop screen is less than 15″.
step 6
LIGHTING

Inappropriate lighting and excess glare can strain the eyes and contribute to a variety of complex vision and eye-related symptoms collectively known as Computer Vision Syndrome.51
Computer Vision Syndrome, estimated to affect up to 90% of computer users, can cause a plethora of symptoms including eyestrain, headaches, tired eyes, eye discomfort, dry eye, and blurry vision after prolonged computer use.525354
There are 2 different types of glare that can afflict your office space:55
Direct glare – A result of bright light shining directly in your field of view, such as sunlight streaming through the window.
Indirect glare – Caused by light (e.g. from window, overhead lighting) bouncing off shiny surfaces and into the eyes. Reflective surfaces include computer screens, shiny tabletops, wall paint with a glossy finish, glass (e.g windows, picture frames), and metallic lamp stands. Indirect glare can cause a bright white spot on the screen, partly obscuring it.
How to Minimize Glare
Arrange your office optimally to reduce glare:56
- Do not place the monitor in front a window. Bright light behind the monitor makes it difficult to see the screen clearly.
- Position the computer monitor away and perpendicular to windows.
- Use window blinds or drapes to reduce brightness. Horizontal blinds are optimal for windows facing North/South, while vertical blinds are better for windows facing East/West.
- Light your workspace with indirect, diffuse lighting. Do not point lamps at the screen, but at the wall to diffuse the light or the tabletop if it is not reflective.
- Clean the screen regularly. Dust on the monitor can contribute to glare.
- Tilt the monitor down slightly to stop it reflecting overhead light.
- If you can’t minimize the glare sufficiently, try using a screen anti-glare filter to reduce the amount of light reflected from the screen.
Lighting your workspace should not create bright spots, irritating reflections, or any other glare. To find glare:
- Shield your eyes with your hands from light coming from various angles (above and to the side) and sources (windows and lamps). If your eyes feel more comfortable when you shield them, narrow down the offending light source and remove it.
- Turn off your monitor and look for any reflection on the screen.
Feeling Great, Working Better
Adjusting your office to suit your needs nixes stress and strain, and creates a workspace that is both comfortable and relaxed. Alas, no matter how perfect and ergonomic your office, we were still deigned to move.
So, take breaks regularly – at least every 45 minutes, for 2 to 3 minutes. Get up, walk around whenever you get a chance. When you take a call, walk and talk (channel the The West Wing). When you can, take a walk outside, even if only for a couple minutes. Stretch when you’re walking, stretch at your desk. Change positions often.
When it comes to setting up your ergonomic home office, small tweaks and adjustments make all the difference to achieving wellbeing.